Italian
  English
  Arabic
  Chinese
  French
  German
  Portuguese
  Russian
  Spanish
  Polish
pressatura a caldo È uno dei metodi più rapidi e affidabili per stampare un disegno su una t-shirt: che si tratti di un regalo unico o di un'attività di abbigliamento, eseguire correttamente il processo fa la differenza tra una stampa che dura nel tempo e una che si sfalda dopo un lavaggio.
Cos'è una pressa a caldo?
Una pressa a caldo È una macchina che utilizza calore e pressione controllati con precisione per una durata specifica al fine di trasferire un disegno su vari materiali, più comunemente tessuti come le magliette. È lo strumento professionale preferito per la creazione di abbigliamento e merchandising personalizzati e durevoli.
Come funziona una pressa a caldo?
Una pressa a caldo Funziona combinando calore, pressione e tempo per fissare in modo permanente un disegno, un inchiostro o un adesivo su una superficie di destinazione come tessuto, ceramica o metallo.
Procedura passo passo per la pressatura a caldo di una maglietta
Utilizzando una macchina affidabile, come ad esempio una Pressa a caldo pneumatica a doppia stazione HOLDWIN—Garantisce una distribuzione uniforme del calore e una pressione costante su ogni capo, eliminando punti freddi e difetti di trasferimento.
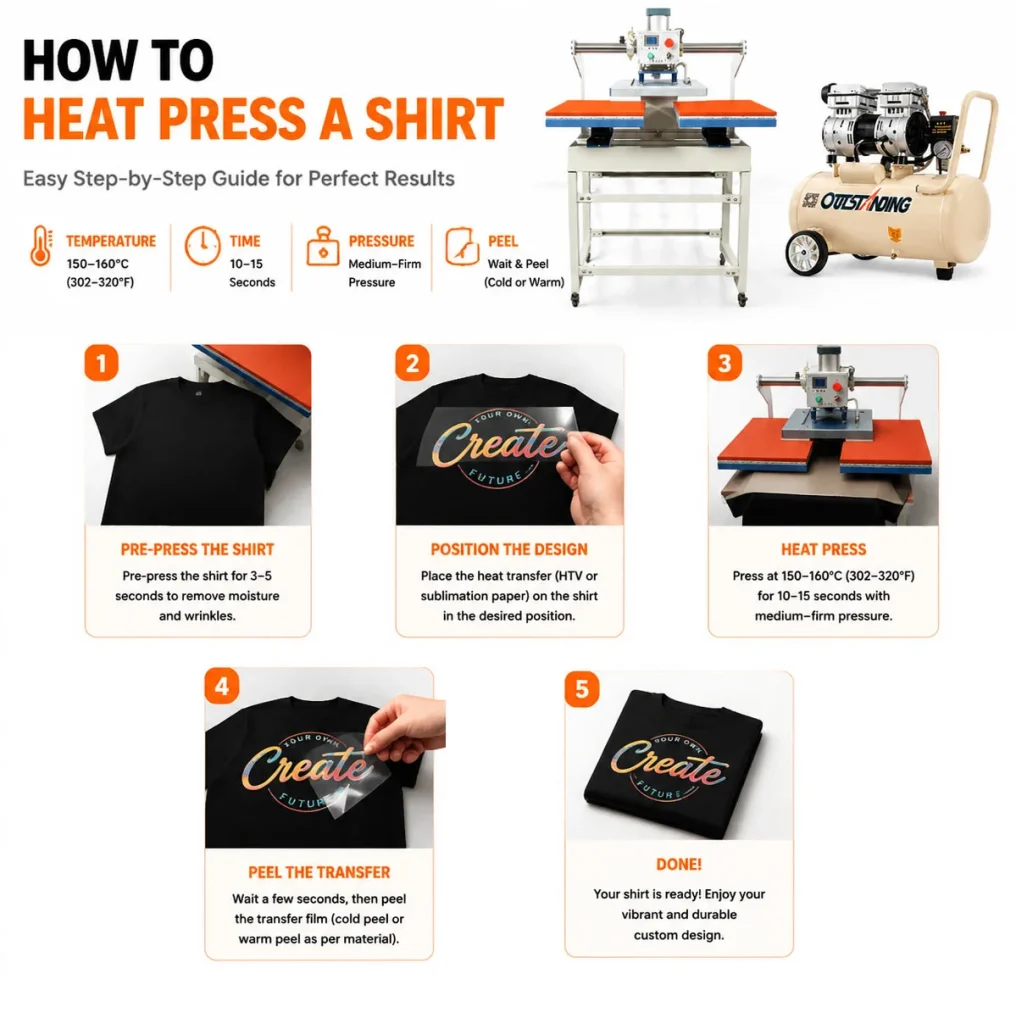
Impostazioni in sintesi:
- temperatura: 150–160°C (302–320°F)
- Orario: 10–15 secondi
- Pressione: Medio-rigido
- Peeling: Attendi e sbuccia (a freddo o a caldo)
Passaggio 1: Pre-stirare la maglietta (3-5 secondi)
Posiziona la maglietta vuota in piano sulla piastra inferiore della pressa a caldo. Premi la maglietta per 3-5 secondi per eliminare l'umidità intrappolata nelle fibre del tessuto e appianare le pieghe superficiali. La pre-pressatura garantisce una superficie piana e impedisce al vapore di interferire con l'adesione dell'adesivo.
Passaggio 2: Posizionare il disegno
Allinea la tua pellicola DTF stampata o carta di sublimazione Applica il trasferimento a sublimazione sul capo pre-stampato nella posizione desiderata. Per un allineamento preciso, utilizza una griglia o una dima per colletti. Fissa i trasferimenti a sublimazione su carta con nastro adesivo resistente al calore per evitare spostamenti o aloni quando il piano superiore si abbassa.
Passaggio 3: Eseguire la pressatura a caldo
Ruotare o far scorrere il piano superiore sopra il piano inferiore e azionare la pressa. Applicare calore a 150–160 °C (302–320 °F) per 10–15 secondi utilizzando una pressione da media a forte. Presse di produzione ad alta efficienza (come modelli pneumatici HOLDWIN) Automatizzare questo passaggio per mantenere una pressione identica durante i cicli di produzione continui.
Passaggio 4: Staccare il trasferimento
Rilasciare con cautela il piano di stampa e sollevare il capo. Staccare la pellicola protettiva in base al tipo di supporto utilizzato:
carta sublimazione: Staccare immediatamente la pellicola protettiva quando è ancora calda per evitare che l'inchiostro lasci aloni.
Pellicola DTF: Attendi qualche secondo prima di staccare la pellicola ancora calda, oppure lasciala raffreddare completamente per una rimozione a freddo, seguendo le istruzioni del produttore.
Fase 5: Asciugatura finale e ispezione (Fatto!)
Lascia raffreddare completamente il disegno prima di piegarlo, imballarlo o lavarlo. Controlla il trasferimento finale sotto una buona illuminazione per verificare la definizione dei bordi, la piena adesione dell'inchiostro e la vivida riproduzione dei colori.Opzionale: Coprire con un foglio di teflon e premere nuovamente per 5 secondi per una sensazione al tatto ultra morbida.
Consigli per una stiratura a caldo di successo di una maglietta
- Pre-stirare la camicia per 5-10 secondi per eliminare l'umidità e le pieghe.
- Utilizzare un rullo adesivo per rimuovere polvere e fibre.
- Per una pressione uniforme, evitare di posizionare colletti, bottoni e cuciture spesse sul bordo del piano di stampa.
- Utilizzare una pressione da media a forte; fare prima una prova su un pezzo di tessuto di scarto.
Una pressa a caldo professionale offre calore preciso, pressione uniforme e un timer accurato, funzionando molto meglio di un normale ferro da stiro domestico.
Le ragioni per cui la pressa a caldo scolorisce la maglietta sono: temperatura troppo elevata, tempo di permanenza troppo lungo, agenti chimici o appretti intrappolati e pressione di pressatura eccessiva.
Le termopresse possono essere utilizzate su molti tessuti, tra cui:
- cotone
- poliestere
- Misti cotone-poliestere
- Nylon (con materiali adatti)
- Tela e alcuni tessuti sintetici
Prima della produzione su larga scala, testare sempre una piccola area.
Sì, una pressa a caldo è un ottimo investimento se realizzate regolarmente magliette, borse o oggetti artigianali personalizzati.
Una camicia bianca assorbe meno calore, seguita a ruota da quelle gialle e grigio chiaro.