ما هو UV DTF؟
الأشعة فوق البنفسجية DTF، الذي يعني مباشرة إلى الفيلم ، غير طريقة وضع الناس تصاميم مشرقة وطويلة الأمد على الأسطح الصعبة. الحصول على هذا المظهر المثالي وجودة المتجر يتضمن أكثر من مجرد ضرب ‘ طباعة. ’ كل شيء يتعلق بإتقان خطوة التجفيف. من خلال الحصول على شعور بكيفية عمل مساحة العمل الخاصة بك وأشعة الأشعة فوق البنفسجية معًا ، يمكنك التأكد من أن كل تصميم تخلقه صعب وملون ومبنى لتستمر. 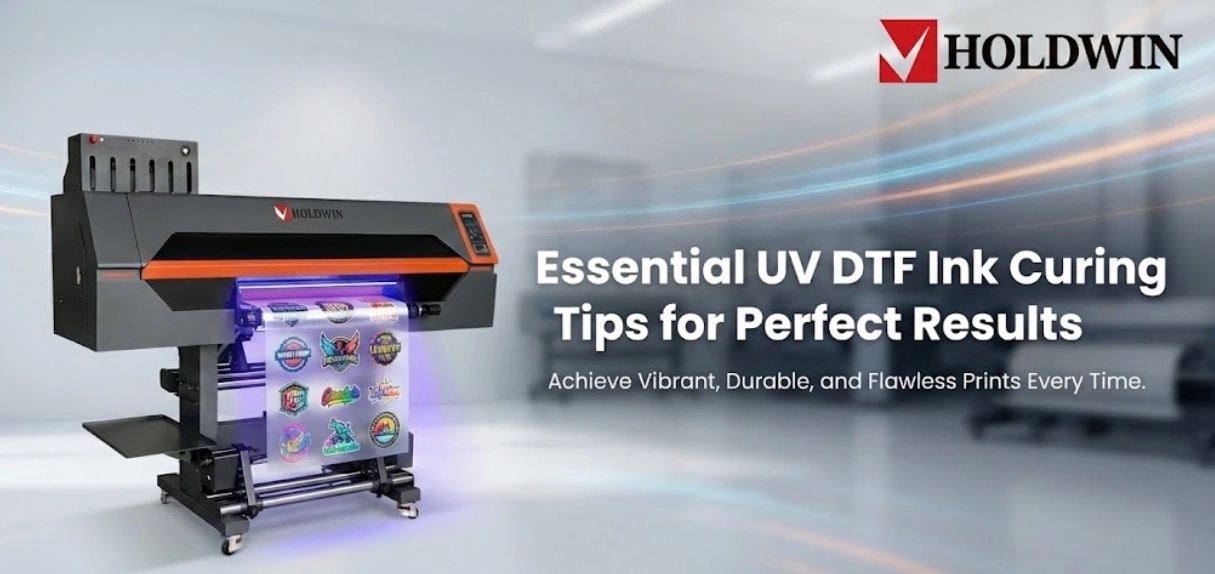
غوص عميق في علاج الحبر المناسب
فكر في التجفيف كجسر بين التصميم السائل والمنتج النهائي. في حين أنه يبدو أن الحبر هو فقط “ تجفيف ” إنه في الواقع يتحول إلى طبقة واقية دائمة. سر العلاج المثالي هو التوازن.
خطر عدم العلاج: الضوء الأشعة فوق البنفسجية الضعيفة يترك الحبر ناعم تحت ، مما يمنع الروابط مع الأشعة فوق البنفسجية DTF AB فيلم وتسبب التصاميم في تلوث أو فقاعة أو تقشير.
خطر الإفراط في العلاج: ضوء مكثف “ الإفراط في الخبز” الحبر ، مما يدمر مرونته ويتسبب في تكسير النقل عند تطبيقه على الأسطح المنحنية مثل الزجاجات أو الخوذات.
حدد الحبر الأيمن للأشعة فوق البنفسجية للركيزة
The “ نتيجة مثالية” يعتمد على تطابق حبرك مع التطبيق النهائي. تقدم هولدوين صيغ متخصصة للقضاء على التخمينات:
للأسطح الصلبة: استخدام حبر الكريستال الأشعة فوق البنفسجية. هذا الحبر مصمم لـ الشفافية العالية جداً و “ كريستال-صعب” إنهاء. خصائصه السريعة التجفيف تضمن الاحتفاظ باللامعة العالية دون الغيوم ، مما يجعلها مثالية للزجاج والأكريليك.
للركائز المرنة: استخدام 3D حبر الأشعة فوق البنفسجية الناعمة. الحبر القياسي غالبا ما يتصدر عند التمديد. صيغة الراتنج الناعم لدينا توفر 200٪ -300٪ مرونة. إنه يشفى إلى طبقة مرنة تتحرك مع الجلد أو TPU ، والحفاظ على “ ؛ اليد الناعمة” شعور.
للإنتاج لجميع الأغراض: معيارنا الحبر القابل للعلاج بالأشعة فوق البنفسجية يستخدم تكنولوجيا الطحن على نطاق نانو. هذا يضمن حجم الجسيمات المتسق للتدفق السلس والشفاء الفوري والمستقر عبر مجموعة واسعة من المنتجات الترويجية.
الحفاظ على الاستقرار البيئي
حبر الأشعة فوق البنفسجية هم حساسين لدرجة الحرارة والرطوبة.
درجة الحرارة: الهدف 18-30°C. يصبح الحبر البارد لزجًا ، مما يؤدي إلى التجفيف غير المتساوي والانحراف المحتمل لرأس الطباعة.
الرطوبة: الحفاظ على 40-60%. الرطوبة المفرطة يمكن أن تتداخل مع الحبر’ الارتباط مع فيلم PET خلال مرحلة التجفيف.
إعداد الركيزة
سيخرج أحسن حبر مجفف إذا كان السطح يحتوي على دهون. نظف العنصر الذي تخطط لاستخدامه، مثل قطعة زجاجية أو خوذة أو ورقة معدنية، مع فرك الكحول. هذا يمسح العلامات الخفية والقذارة، مما يعطي قاعدة بلا بقع للعصا. هولدوين يشير إلى أن الاستعداد يغطي نصف عمل التجفيف ؛ تخطيه ، وسوف لا الحصول على عقد قوي بقدر ما يمكن.
إتقان إعدادات الطباعة والأشعة فوق البنفسجية
يأتي قلب DTF الأشعة فوق البنفسجية في التجفيف السريع مباشرة خلال وقت الطباعة ، حيث يتحول الحبر الرطب إلى ورقة ثابتة منحنية.
معايرة طاقة مصباح الأشعة فوق البنفسجية
توازن قوة ضوء LED الأشعة فوق البنفسجية بعناية. الطاقة المنخفضة تترك الحبر لاصق، لذلك يمس عند طبقته. الكثير من الطاقة تحول الحبر صعب وسهل الكسر، مما يجعل التصاميم تقسيم على العناصر المستديرة. قم بالتحقق السريع عن طريق رؤية ما إذا كان الحبر الأبيض يشعر بالصلبة ولكن لا يزال يعطي القليل عندما تضغط عليه.
التصفيح واستقرار ما بعد الطباعة
بعد انتهاء الطباعة ، تحتاج الورقة الجافة إلى المزيد من الوقت لتعيينها. يحتاج الرابط بين الجانب المطبوع ، فيلم A ، والفيلم الخلفي ، فيلم B ، إلى فترة احتجاز.
دقة التصفيح
استخدم آلة الصحافة الباردة مع دفع ثابت لإضافة الفيلم الخلفي. هذا يضغط على الغراء في الحبر المجفف. الفقاعات الصغيرة تعني بقع جافة ضعيفة حيث لم يطفئ الضوء حتى. ابقي الأسطوانات خالية من الغبار ودفع نفسها عبر عرض الورقة الكاملة.
أهمية “ الراحة” الوقت
من السهل نقل التصميم على الفور ، ولكن انتظر 2 إلى 12 ساعة للورقة المنضمة. هذا التوقف يسمح للحبر واللاصق ربط كامل واستقرار. هولدوين الخبراء اقترح ليلة كاملة للعمل التفصيلي مع خطوط رقيقة ، بحيث تبقى الجانبان أسفل عندما تضعها آخر مرة.
التطبيق النهائي والعلاج الثانوي
الجزء الأخير يحدث على البند الحقيقي. الضوء فعل الأكثر أثناء الطباعة ، ولكن الغراء يحتاج إلى متابعة الجافة مع الوقت والدفع.
تقنيات النقل المناسبة
عند اللصق عليه ، استخدم أداة مسطحة للدفع بقوة من الوسط إلى الحواف. هذا يبدأ الغراء الذي يلتصق بالضغط. سحب الفيلم الخلفي ببطء بزاوية حادة. إذا سحبت بقعة ، اضغطها مرة أخرى بقوة أكبر.
قاعدة 24 ساعة
الحصول على أفضل ما هو عليه بعد حوالي 24 ساعة على البند. تخطي الغسيل أو الاستخدام الشاق في ذلك الوقت. هذا الانتظار يسمح الغراء يغرق في ثقوب صغيرة على القاعدة، والحفاظ على حبر DTF الأشعة فوق البنفسجية مغلق للأبد.